fort // Minecraft club

My lil’ guy loves forts.  Outdoor forts, indoor playroom forts, forts above his bed, forts built in the closet with cushions, etc.  So,  my husband spent a few weekends building an outdoor fort underneath our deck for him and his friends.  I won’t get into the step by step, since we are by no means professional contractors, but will opt to show you some before and afters.

First, the BeFoRe…

_MG_1771 _MG_1772

Now, for the AfTeR…


IMG_0878

We purchased a $5 door in the scratch and dent section at Home Depot.  I applied 2 coats of chalkboard paint.  The hubs added molding that I had stained and hung it with some hardware from the plumbing section.  Add wheels on the bottom, a handle also from the plumbing section, and you have a sliding chalkboard door.

IMG_1619

We painted the outside to match the outside of the house.  Looks like I still need to caulk some nail heads and do some more painting…

This is what it looks like now that my lil’ guy and his friends have been playing in it for a few months.

outdoor fortYes, my lil’ guy is just a wee bit obsessed with Minecraft these days, so the fort is currently home to The Minecraft Club.

We added a bell and a peep hole (lil’ guy circled it in the photo above), so no one gets in unnoticed…

IMG_1609

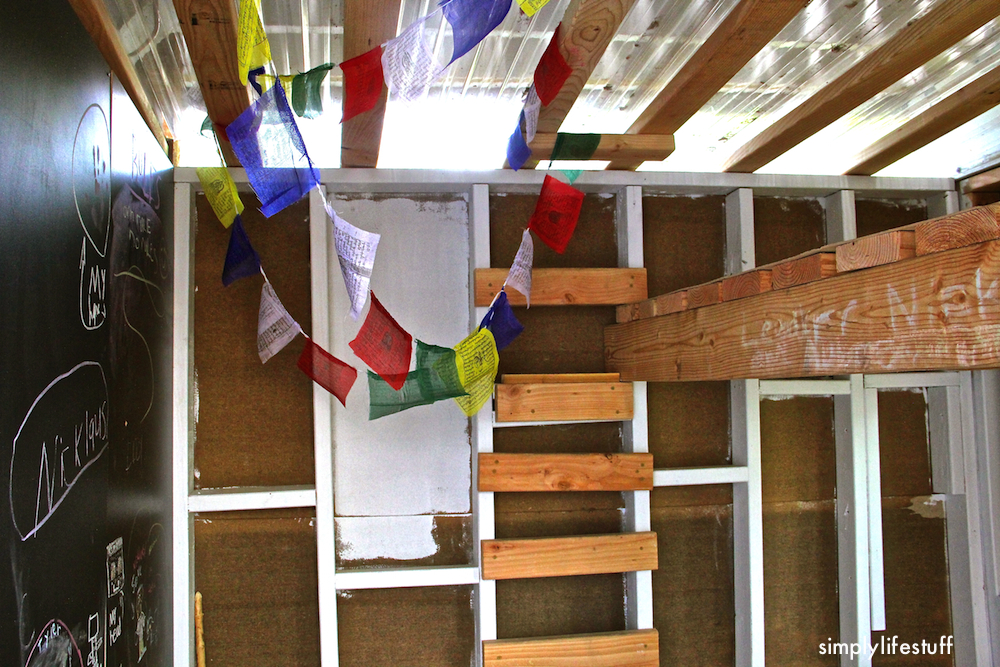
Here is a quick peek inside, which as you can tell, still needs some DIY love.  The hubs added a ladder with a bed in case the lil’ guy decides to camp outside one night, and two chairs that can be folded up when not in use, some prayer flags, and more chalkboard wall for “the writing of the rules.”

IMG_1615 IMG_1614
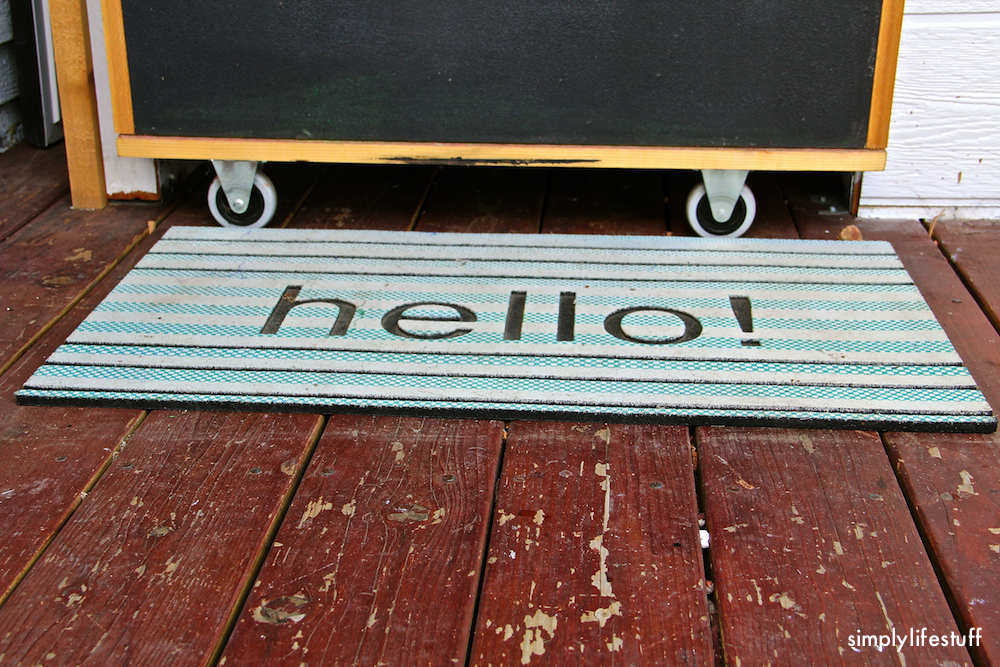
As you can guess, this fort has seen a lot of love already.  Hope you enjoyed this tour of The Minecraft Club.  And of course, it is not complete without a welcoming mat.

IMG_1620

lil’ changes

Snowing here today, so just enjoying a little time indoors in front of my computer.  Since I am inside today, I decided to take a few photos to share some lil’ changes that have been happenin’ in our lil’ home.

The first change is related to this post titled Before and After.  I mentioned that I would be changing out the two desks for a larger table that could double as a desk to help balance the scale.  It has telescoping legs so we can do “sit down and dine” style or “buffet” style.

Before with two small desks

After with the larger desk/table

What do you think?  I cannot wait to score some modern multi colored chairs to have on hand when we have friends over for dinner.  And, I scored that lamp for $14 on one of Target’s Clearance racks.

The second change is some little updates N has made to our art wall.  He is forever creating.  That is the beauty of this art display; it is “easy peasy” to change out pieces of art.  The Wall of Art was introduced in this post.

The third lil’ change involves the area above our coat rack we made out of water valves that you can check out here.  I simply took the Instagram photos I had printed through Mpix and glued them onto white foam board and played around a little with the arrangement.

Kid's coat rack

Before

After

And finally, I scored a spring wreath for my front “Hello Door.”

I love this vinyl decal so much that I ordered some numbers for a different project that I am sure I will share with you.  I love making simple changes around the home.  Sometimes, it is the little things.

Have you made some simple changes lately in your house that make it seem more like your home and that make you smile?  Please share.

Hope these lil’ guys survive this round of snow that we are getting here today.  Patiently waiting for spring.

Tracking Travels With 3-D Butterflies

I love adding little details to my house to make it feel more like my home.  In my guest room, I recently added some 3-D butterflies to the wall.  I originally got this idea from the Young House Love book #134.  They used pages from an old book for their art, but I chose to use maps.  My family loves the outdoors and adventures and the hubs makes maps, so it was a no-brainer.  Here is all you need:  a butterfly cookie cutter, a pencil, a map of the area you have travelled, a pair of scissors and some little pins.  I used little red map pins.

Needed supplies

Needed supplies

No detailed instructions are needed.  I simply opened the map and folded it in the area I wanted to use, traced half of the butterfly on the fold, and cut it out.  When you cut it out, you will have a complete butterfly.  I cut out multiple butterflies in some of the areas we have travelled, and then pinned them to the wall above the bed.    This is a small way to keep track of our adventures.  You can see another way we track our adventures by clicking here.

3-D Adventure Butterflies

3-D Adventure Butterflies

Here is a close-up.

Map 3-D Butterfly

Map 3-D Butterfly

If you noticed in the above picture, I paired these little beauties with a Katie Daisy print that displays words my family and I live by:  The World is a Playground. I chose butterflies because they mimicked the butterflies in the print.  However, you can choose any shape you like.  Every time I look at these little butterflies I know they depict some of our many adventures, and I smile.  I hope my guests enjoy looking at them.  Sometimes, it is just the little things.

Have you repurposed old book pages or maps to make something for your wall?  How do you track your adventures or travels?  Please share.

Here is one way my family sees the world as a playground.

Hiking at Chicago Lakes

Hiking at Chicago Lakes

Accessorizing Completed

I love small projects that pack a big punch.  I love them even more if they take very little money from my pocketbook.  For awhile now, I have been admiring a certain cracked glass LED outdoor light on a house at the end of my street.  Oh how that light shines with a nice brightness and cool pattern.  We like it so much that we even approached the owner when he was outdoors one day to ask him where he purchased it.

When the hubs and I went to the local Home Depot this weekend looking for a mini fridge, I found a cracked glass LED light, not just like my neighbors but oh so nice.  In addition, I had recently pinned a certain little garage door makeover from the Garr Den of Love blog.  In my logical way of thinking, I figured if we were changing out the light fixture right beside the garage door, we may as well add some accessories to that said door.  Here is what we purchased.

Hampton Bay Cottrell Collection Wall Mounted Outdoor Aged Bronze LED Powered Lantern

Crown Bolt Traditional Decorative Garage Hardware Kit in Black

I will not go through a step by step for you because the instructions to install the accessories are listed on the Garr Den of Love blog post that you can find here.  As well, the instructions are listed on the back of the package.  I will say that the accessories were on sale for $10 bucks.  Here is our before.

Before

Before

And after a little magic from the hubs, here is our after.

After

After

We have plans to add some stone work to both sides of the garage door and add another one of those LED babies to the other side.  What do you think?  I ran outside twice last night just to see that baby shine.  So, we have glammed up our garage door area without spending a fortune on a brand new Carriage style door and I can now lust after my own lighting.

Have you made a small change to the outside of your home that took little time and money?  What “big bang for your buck” projects have you completed?  Please share.  Small projects with little effort and money just make me smile because sometimes, it is the little things.

And before I leave you, this little guy greeted us this weekend.  Are you ready for spring?

Spring, Anyone?

Spring, Anyone?

Before and After

Just thought I would share a few “before” and “after” pictures with you today.  My family and I moved to CO about 9 months ago.  In that time, we have been working to make our new house feel more like “our home.”  We repainted the walls after I went through paint paralysis.  Choosing a paint color, especially a gray that wasn’t too blue or too purple or too beige, took me some time and many cans of sample paint.  Now, I am a sample paint can advocate, for sure.  I mean, after all, the small cans usually cost less than $5 and save you a ton of money in the long run.  Plus, you have extra paint for small craft projects.

Choosing a gray

Choosing a gray

I finally chose Moonshine from Benjamin Moore, and I could not be happier.  In addition to painting, we ripped up the carpet and had hardwood installed.  We also removed the small wood colored baseboards and replaced them with wider white ones to make the floor “pop” a little more.  Are you ready for a few “before” and “after” shots?

BEFORE

AFTER

AFTER

Obviously, the prior owners used the front entrance room as a sitting area.  However, right now it is mine and N’s office/work area.  We have plans to put a longer table in this room so we can have family and friends over for dinner.  The table we have picked out can double as a desk.  Love when things can serve multiple purposes.  We need some thing bigger in that room to help balance the scale.

Here is another area of the house “before” and “after.”

BEFORE

AFTER

AFTER

The prior owners had a separate ceiling fan mounted flush to the ceiling, and a light that hung down too far and obstructed the view.  We opted for a fan/light combo.  We added metal sheeting to the bar area, and handles to the cabinets.  We have plans to change out the countertops and possibly add different/more lighting in the kitchen area.

BEFORE

AFTER

AFTER

That brown wall screamed at me every day, but now it makes me smile.

What do you think?  We have many other exciting projects planned for our new home, but we are pleased with the transformation, thus far.  Paint can certainly make a huge difference.  I definitely enjoy relaxing in my new home and daydreaming about additional changes.   Sometimes, it is the little things, even if they take time and money.

Have you changed something in your house to make it feel more like “your home”?  Did you have the idea yourself or did you ask for design advice?  Do you have paint paralysis like me?  Please share.

Washi Love

I am in love with WASHI tape.  I use it on little gifts, like these message bottles I put together for N’s friends for Valentine’s Day.

Washi on Gifts

Washi on Gifts

I wrote a post about how I use it here on our Reading Tree.

Washi on Reading Tree

Washi on Reading Tree

I used it at Christmas time to make my N an Advent Calendar.

Washi Tape Advent Calendar

When N’s grandmother and great grandmother visited from Florida during Thanksgiving, I used Washi tape to welcome them.

Washi Welcome Sign

My latest Washi inspiration came from a pin I posted on Pinterest.  This creative person used Washi tape as an inexpensive, simple picture frame.

Washi tape frames from Design Sponge

These are so cool!  So, I decided to use this idea in my guest bedroom.  So, I grabbed a card that inspires me, a picture that my son created, and a Katie Daisy print.  I then grabbed my washi tape that I had on hand and began taping.

Washi tape frame

Washi tape frame

Washi tape frame

Washi tape frame

Washi tape frame

Washi tape frame

Here is how they all look together.

Washi tape frames

Washi tape frames

I think my guests will enjoy this artwork display.  It will show them that they are welcomed and loved.  Hopefully, it will make them smile as much as it makes me.  Sometimes, it is just the little things.

Do you love washi tape?  What uses have you found for this amazing tape?  Do you have a way that you frame cards, artwork, etc. other than using traditional frames?  Please share.

Cashmere Banner, Anyone?

I was going to share with you today a tip I use in my home to organize gloves and hats, so we are never searching for them.  Well, never is a strong word.  However, it is a sunny, warm day here in CO, so I had a little “spring fever” running through my veins.  I have been saving the J.Crew Italian Cashmere catalogue for some time now because I was absolutely drawn to the pastel colors.  So, I grabbed that catalogue along with some additional supplies:  scissors, a pencil, letter and shape stencils, thumbtacks, twine, and miniature clips.

Needed supplies

Needed supplies

I had all of these supplies on hand and readily available.  First, I opened the pages of the catalogue and chose the pages that appealed to me.

Aren’t these colors so refreshing and cool?  I then traced the letters onto the backside of the page I wanted to use.  Being careful to flip the stencil, so that when I cut them out, the letter would be correct.  I traced the letters on the backside of the page I wanted so that when I cut the letters out, I would not see my pencil marks.

Trace the letter stencils

Trace the letter stencils

I then proceeded to cut out all of my letters, along with five ovals in the shape of Easter eggs.  I cut the length of twine that I needed and tied each end around a thumbtack.  I then placed the twine above my fireplace where a mantel will eventually sit one day.  Finally, I used my miniature clips to clip the words and egg shapes to the twine.  And voila!

Easter Banner made from a J.Crew catalogue

Easter Banner made from a J.Crew catalogue

Here is a little closer view.

OK.  Not a “knock your socks off” kind of banner, but certainly an inexpensive and quick one that just makes me smile.  Sometimes, it is just the little things.

Do you repurpose catalogues or hang on to one just because of the amazing graphics or layout?  What is your favorite catalogue to get through the mail?  You know, the kind where you grab a cup or glass of your favorite drink and dare anyone to bother you.  Have you started decorating for Easter?  If so, please share some of your simple decorating ideas.

Wall of Art

My N loves to draw.  I love that he loves to draw.  So, to foster this I signed him up for art classes at The Bean and Belle when we were living in NC.  He learned so much.  It was so great how the teacher had them work on a single project for weeks, concentrating on all of the details needed to make the artwork amazing.  Here he is at his first art show with one of his masterpieces:

N's Wild Thing named Hairy

N’s Wild Thing named Hairy

Don’t let the serious look fool you, he was beyond stoked and so proud.  I have always displayed his artwork in various areas throughout the home.  I enjoy looking at them as much as he enjoys making them.  When we moved to CO, I wanted a way to display his art but also be able to change it out easily.  So, one day I saw this picture on a blog that I read, and I posted it to one of my Pinterest boards.

Displaying art

Don’t you just love how clean and simple this looks?  It looked like a great way to hang a lot of different pieces and to interchange it easily.  So, the hubs and I got to work.  Well, I gave him the idea, and he actually did most of the measuring, cutting, and staining.  I did not take pictures of each step in the process.  Sorry, that was pre-blog.  But basically, we measured the wall going up the staircase to determine the length of the boards we needed.  After taking measurements of the boards that would go horizontally and vertically, the hubs cut them.  He then laid them out and stained them with a dark stain.  We have a lot of woodwork in our home, so we wanted to contrast the boards for the art wall with the other wood. After several coats of stain and dry time, we brought the pieces indoors and mounted them to the wall.  I purchased hangers from the trusty old Target at less than $5 for four and Voila!

Here you have it as it looks ToDaY.

N's Art Wall

N’s Art Wall

You will notice his Wild Thing named Hairy is still with us, along with some newer pieces he has created.  I have also added some quotes to the art wall.  If you are not familiar with Katie Daisy (Take a Hike, as seen above), check her out.  I have several of her prints hanging in my home.  I love it, N loves it.  I plan on changing out the quotes as I find ones that “speak” to me or a member of my little family.

So, what do you think?  Do you have one area in your home where you display the kiddo’s art?  Does your kid enjoy drawing?  Does he/she draw anything in particular?

Every time I look up at this wall, I just smile because sometimes it is just the little things.

The Reading Tree

As some of you know, my family moved to CO less than 9 months ago.  Since that time, we have been making various changes to our house to make it more of “our home.”  We have painted a majority of the walls and replaced the carpet with hardwood floors.  Once the walls were painted, the hanging began.  Well, hanging of pictures, that is.

When you walk in our front door, there is a huge blank wall.  That blank wall kept beckoning me to do something with it.  We kept thinking about what we could put there.  I have an amazing one-of-a-kind painting on the wall adjacent to the blank wall, so I wanted NOTHING to compete with it.

Ryan Bradburn Original

Ryan Bradburn Original

This painting was given to me by an extremely talented coworker who has gone on to do even more amazing things.  You can check out his website at www.ryanbradburn.com  Here is another view to help you get oriented.

The wall opposite the windows and front door is the blank wall I am referring to.  Don’t mind the small desks in that room.  We have plans to purchase a long table that we can use when we have friends and family visit.  The table will also double as mine and N’s desks.  But that is for another day.

My hubs decided that a decal would be great.  Specifically, a decal of a tree.  I loved the idea and it was fairly inexpensive.  So, here is the wall now.

This decal also came with a quote:  “Do not be afraid to bite off more than you can chew.”  We have not decided yet whether to add that quote to the wall.  Oh, and see those little pieces of paper?  N decided that this would be his “Reading Tree.”  So, every time he finishes reading a book, he writes the title and date on a piece of paper and uses a small piece of  washi tape to place it on the tree.

N's Reading Tree

N’s Reading Tree

Win, Win.  I decorate my wall and N is motivated to read more books.  Here is how it all looks.

What do you think?  We will be adding a light above the painting soon.  It has already been purchased, but still sits in its box.

I love the tree decal.  Now, when I walk in my front door, I smile.  It also looks great from the outside at night when my desk light shines on it.

Do you have a big wall decal in your house or have plans for one?  What do you think about adding the quote to the wall, as well?  I love when things come together, even if sometimes, it is just a little thing.

Well, Hello…

I love doing simple things around our house to make it feel more like OUR HOME.  I often get my ideas perusing the web and reading various blogs, magazines I subscribe to, Pinterest, Houzz, etc.  While reading through the  Young House Love book, I discovered my love on page 320 where they put a vinyl decal on their front door.  They decided to put their house number.  However, I opted for something a little different.

Front Door

I purchased the vinyl decal from this Etsy shop.  Don’t pay attention to the fact that I have no wreath currently hanging on my door or the fact that I desperately need to change out that light fixture.  Here is another view from the road.

My "Hello" Door

My “Hello” Door

See how well it shows up even from a distance.  Looking up at that door when I am outdoors playing with my N and his friends, just makes me smile.  The best part…it took a little less than $7 and about 15 mins out of my day.  After all, sometimes it is just the little things…  I hope it makes my visitors smile, as well.

Have you added something to your front door that just makes you smile?  A new paint color or perhaps a new wreath?  Have you used vinyl decals anywhere in your home?  I am thinking of getting number decals for my stairs indoors.  What do you think?